
Hanging a light fixture, a camera, or a house number on a roughcast wall may seem trivial. However, exterior roughcast is a fragile coating that cracks or chips at the slightest poorly prepared drilling. Firmly securing to exterior roughcast without damaging the facade requires understanding what lies beneath the finish layer, then choosing the right technique based on the weight of the object.
Facade insulated from the outside: the trap that no one sees before drilling
Before even taking out the drill, one question changes everything: is your wall covered with external thermal insulation (ITE) under the coating? Since the increase in energy renovations encouraged by France Rénov’ and Ademe, many roughcast facades now hide several centimeters of insulation beneath the finish layer.
Read also : How to Effectively Train for Digital Careers and Boost Your Career
Drilling into a roughcast applied over an ITE system with a standard plug creates two problems. The first is a localized thermal bridge, which degrades the energy performance of the envelope. The second is a risk of water infiltration around the hole, a source of increasingly frequent damage according to feedback from artisan networks like Capeb and FFB.
To know if you are affected, tap the facade: a hollow sound indicates insulation behind the roughcast. If this is the case, long through plugs with thermal bridge breakage are necessary. Manufacturers like Fischer and Würth offer systems with technical approvals from CSTB, designed to penetrate the insulation without compromising waterproofing or thermal performance. Knowing how to fix on exterior roughcast starts with this verification of the support.
Related reading : Discover the best tips to boost your fitness and well-being
Adhesive fixing on exterior roughcast: when sealant replaces the drill
For light to medium objects (wall decorations, small light fixtures, motion detectors), fixing without drilling avoids any risk of cracking the roughcast. This approach is gaining ground among professionals as well as individuals.
MS polymer or polyurethane sealants for exterior use are the most suitable for roughcast. They adhere to irregular surfaces, resist UV rays and temperature variations, and maintain slight elasticity that absorbs micro-movements of the facade.
Preparing the surface before adhesion
The roughcast accumulates dust, moss, and micro-particles that prevent proper adhesion. A vigorous brushing with a stiff brush, followed by dusting, is sufficient in most cases. The surface must be perfectly dry: wait at least 48 hours after rain.
On very grainy roughcast, applying the sealant in thick beads rather than a thin layer allows filling the hollows and increasing the contact surface. Holding the object in place for 24 hours with wide masking tape ensures complete adhesion before any stress is applied.
Limits of adhesive fixing on facades
Adhesive fixing is not suitable for heavy loads: a wall lamp weighing several kilos or a retractable awning requires mechanical anchoring in the load-bearing support. Have you ever seen a house number fall after a scorching summer? The adhesive probably endured too high a temperature without adequate UV protection.
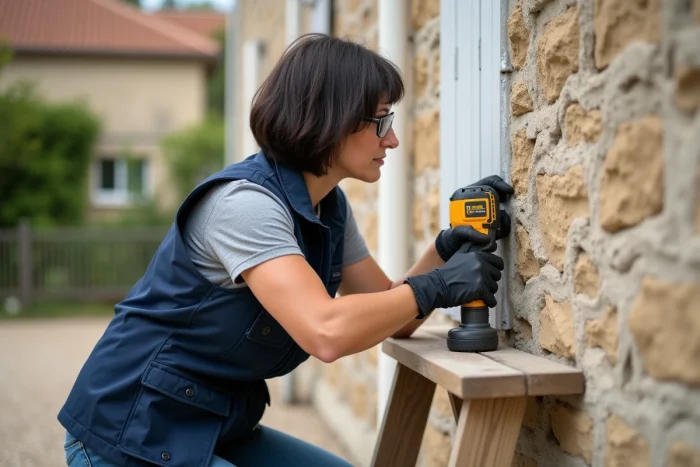
Drilling exterior roughcast without damaging it: step-by-step method
When the weight of the object necessitates drilling, success largely depends on preparation and tool adjustment.
- Apply a piece of wide adhesive tape on the drilling area: the tape keeps the grains of the roughcast in place and prevents chipping around the hole
- Use an adjustable percussion drill and start at low speed, without activating the percussion, to penetrate the roughcast layer without causing it to burst
- Activate the percussion only after penetrating the roughcast, when the drill bit reaches the hard support (concrete, cinder block, brick)
- Choose a tungsten carbide drill bit, whose diameter exactly matches that of the plug, to avoid a hole that is too large which would weaken the hold
This protocol works on both sprayed and troweled roughcast. The key remains patience: forcing at the start almost always causes a burst.
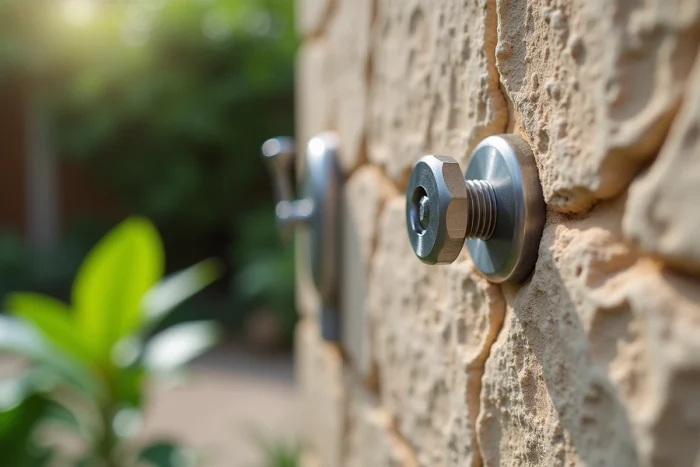
Choosing the right plug according to the load-bearing support
The roughcast does not bear anything. All the load rests on the wall underneath. A solid concrete wall accepts standard expansion plugs. A hollow cinder block or cellular brick wall requires toggle plugs or chemical anchors, which distribute the load inside the hollow material.
To identify the support, observe the drilling dust: gray and fine for concrete, coarser and darker for cinder block, reddish for brick.
Repairing damaged roughcast after fixing: treating the hole to prevent infiltration
Building pathology experts have noted an increase in damage related to infiltrations around fixing points on coated facades. An untreated hole, even a few millimeters wide, allows water to seep behind the roughcast, causing swelling and detachment in the medium term.
After tightening the screw, apply a peripheral joint of acrylic or silicone sealant for exterior use around the fixing. This waterproof joint protects the facade as long as the fixing remains in place.
If you ever remove the fixed object, fill the hole with a repair paste for roughcast, available in shades close to common finishes. Smooth with a spatula, replicating the surrounding texture, then let dry before applying touch-up paint if necessary.
Fixing on exterior roughcast without damage relies on three successive choices: identifying the actual support beneath the coating, adapting the technique (adhesion or drilling) to the weight of the object, and systematically waterproofing each hole. Neglecting any of these steps turns a simple operation into an expensive facade repair.